Decoding Malware Mysteries: A Deep Dive into Static, Dynamic, and Behavioral Analyses

Ever wondered how experts figure out what malware is up to? They use cool techniques like Static, Dynamic, and Behavioral analyses. Think of it like this: Static analysis is like reading a recipe without cooking it - you get an idea of the dish but don’t taste it. Dynamic analysis is like following the recipe and cooking the dish to see (and taste) the result. And Behavioral analysis? It’s understanding why someone would cook that dish in the first place. In this article, we’ll dive deep into how these techniques helped us understand a tricky malware using the fakedns tool. It’s a bit like detective work, and it’s super interesting! So, let’s get started and uncover the secrets of malware analysis together.
Static Analysis
Before deciding whether to examine the malicious program using behavioral or code analysis techniques, we will make the initial assessment of the file by examining its static properties. Perhaps the file may not be malware because the hash found in the exe file may belong to a reliable program, or we may find that someone has analyzed our file before. Moreover, static analysis can tell us where we should focus on the file we will examine. This first step can be quite useful. I will look at some of the features in the items I provided below.
- File and Section Hashes
- Embedded resources
- Imports and Exports
- Section names
- Certificates
- Words it contains
- Packer detection
Generally, the first step is to look at meaningful words. This way, we might uncover file names, host names, or registry keys the program wants to access. This can help in some parts of our review. Of course, we cannot trust every written word, as some may have been placed to make it difficult for the Malware Analyst or to mislead. I will use the well-known strings tool for this.

We found a few potential activities:
- The program may be using the “HTTP/1.1” word when making an HTTP connection.
- The program may be using the “Software\Microsoft\Windows\CurrentVersion\Run” string somewhere to maintain persistence in the system.
- There seems to be a Brbconfig.tmp file
- %s?i=%s&c=%s&p=%s may be part of an HTTP request.
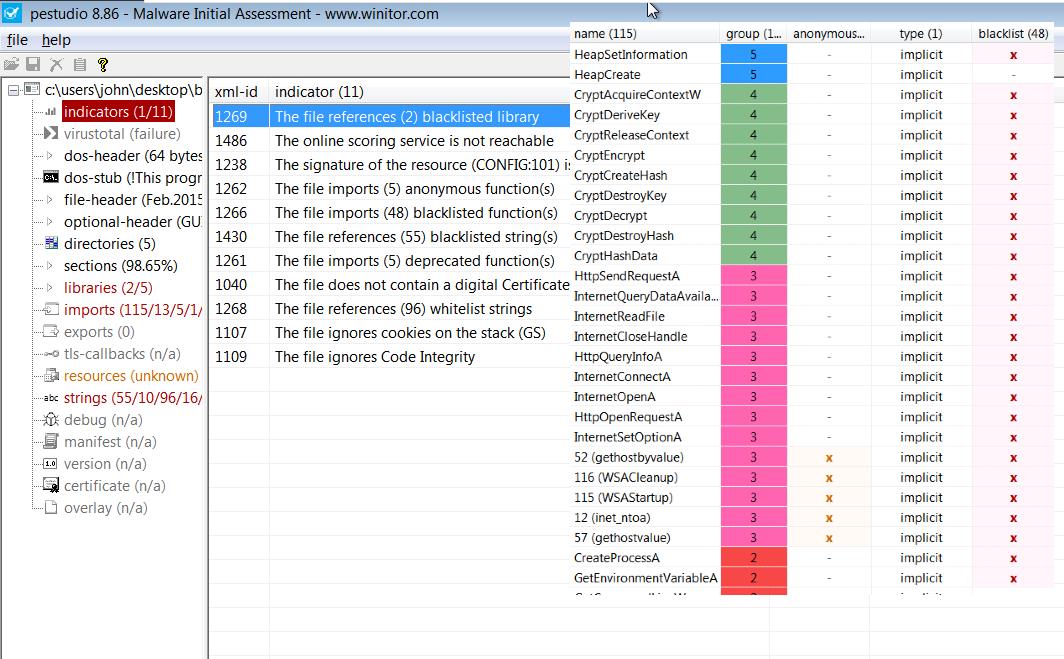
One of the best features of pestudio, in my opinion, is the indicator area. This area automatically shows suspicious situations of the examined file from different angles. For example, in this example, some risky Windows API calls are made, one of which is the “HttpSendRequestA” call.
Another detail is that pestudio shows the md5 and sha1 hashes of the examined file. These hashes are like a digital fingerprint of the file, meaning they are unique. These hashes are generally displayed as IOC in reports by malware analysts.
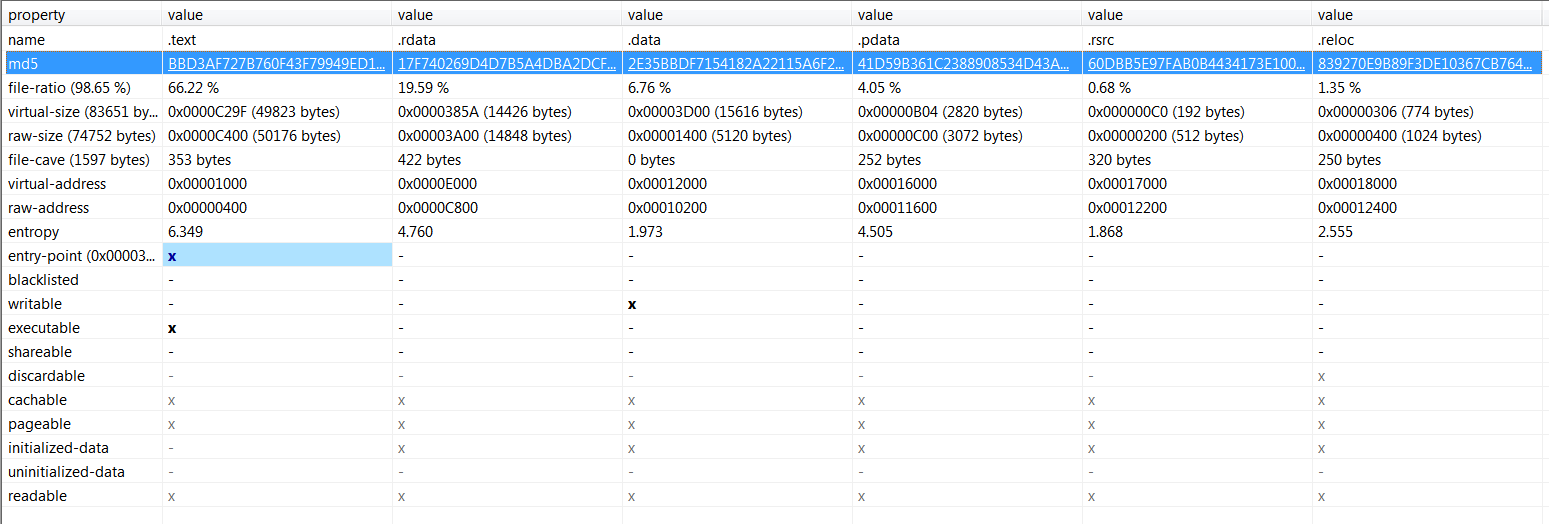
Hash values can be used as IOCs and allow the institution to detect malicious software regardless of the file name. Malware Authors can easily change the hash value without changing the function of malware. For this reason, it is necessary to note the section hashes of malicious software as well. If this path is followed, the hash values of the other sections can still be used as IOC if the malware author changes a section. If you are not familiar with Windows exe files, it should be noted that programs designed to run within windows are divided into “sections”, consisting of code and data sections. For example, .text, .data, .rsrc, .reloc in the picture.

If you have a suspicious file and want to collect information about it without spending money, virustotal is the tool for you. The most well-known feature of virustotal is that it uses over 100 antiviruses to scan the file you provide. A few other features are displaying the APIs and Dlls the file imports and providing the hash values of the file and its sections.
You should be careful when uploading such files to online services because, in a targeted attack, the attacker may also want to look at such sites to find out whether the malicious software he wrote has been discovered or not, or the institution you are in may not want to share such malware. If you have doubts about this software and are in situations like the ones we mentioned above, perhaps the best idea may be to search for the hash values or IOCs of this file.
Behavioral Analysis
Now we will observe how the harmful will behave when run in our lab environment. We will do this with a few tools, let’s take a look at what our tools do.
Process Hacker: A powerful process manager. It can also be used as Task Manager.
Process Monitor: It helps to examine the communication of processes with other environment components.
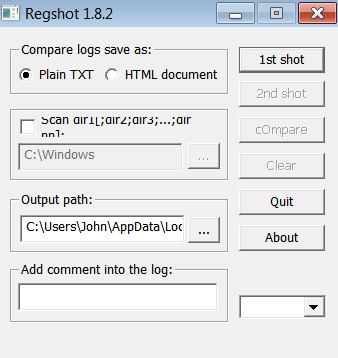
Regshot: It allows us to compare the registry records before and after the malicious software infected our lab and see what changes the malicious software has made.
Now we are starting the behavioral analysis part. The first thing we will do when starting is to take a shot, a system status record, with the Regshot tool.
Immediately after, we open and minimize our Process Hacker tool so that it can record the processes when the malicious software is run.
Now we run the malicious software and wait for about 30 seconds and then terminate its process with Process Hacker. The reason we wait for 30 seconds is to wait for the malicious software to complete all its processes.

After stopping the process of the malicious software, we take our 2nd shot with Regshot.

Now we compare these two shots. We can do this by pressing the “Compare” button.
Regshot detected a new file on the desktop.

However, the content of this file is encrypted. After all, malware authors tend to encrypt files related to the software they write.
Let’s also take a look at Process Monitor.

As we also captured in Regshot earlier, we see that our harmful file created a file. As we saw earlier, we see the creation of the brbconfig.tmp file again here.
Now let’s take a look at our remnux machine. The harmful software was open throughout the running time, as were the wireshark application running on remnux. Let’s take a look.
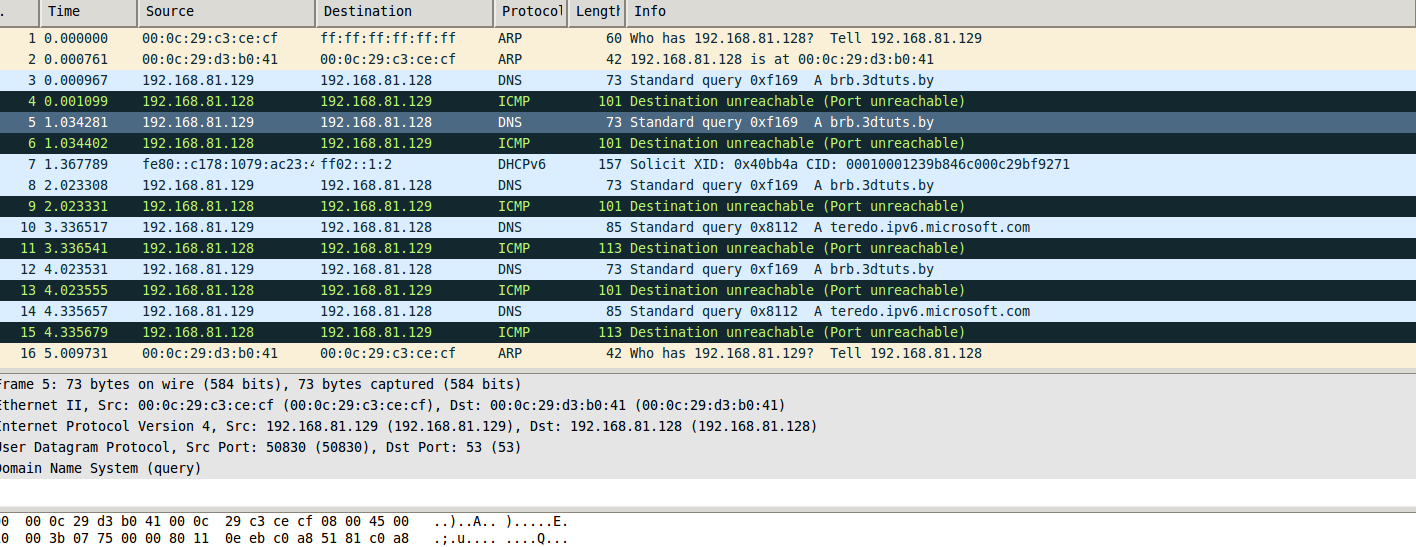
We see that the system infected with malicious software tried to send a request to the host brb.3dtuts.by, but it cannot access the IP address as no DNS service is running, so it cannot connect.
For this, we have a tool in remnux, and its name is fakedns. This tool listens to DNS requests coming to our machine and responds to any request with the IP of the remnux machine, i.e., its IP.
As you can see in the image, fakedns associates the DNS request for brb.3dtuts.by with its own IP address and sends this to our infected machine.
This is the network status after launching the fakedns tool. As you can see, it is trying to establish a TCP connection but cannot because there is no accessible web server open in remnux. To open a web server, we enter the http start command into the terminal.
On our Windows machine, we open Chrome and make a request to brb.3dtuts.by (could be any site) to see what happens.
On Remnux, we can see the web server we started with dademin is running. Of course, our fakedns tool is also running at the same time.
As seen in the photo, the infected system (in this example 192.168.81.129) has successfully established an HTTP connection.
After establishing the HTTP connection, let’s look at the request. We’ll right-click on the packet and select “Follow TCP Stream”. When we do this, Wireshark will bring up the ASCII values of the packet we’re tracking.
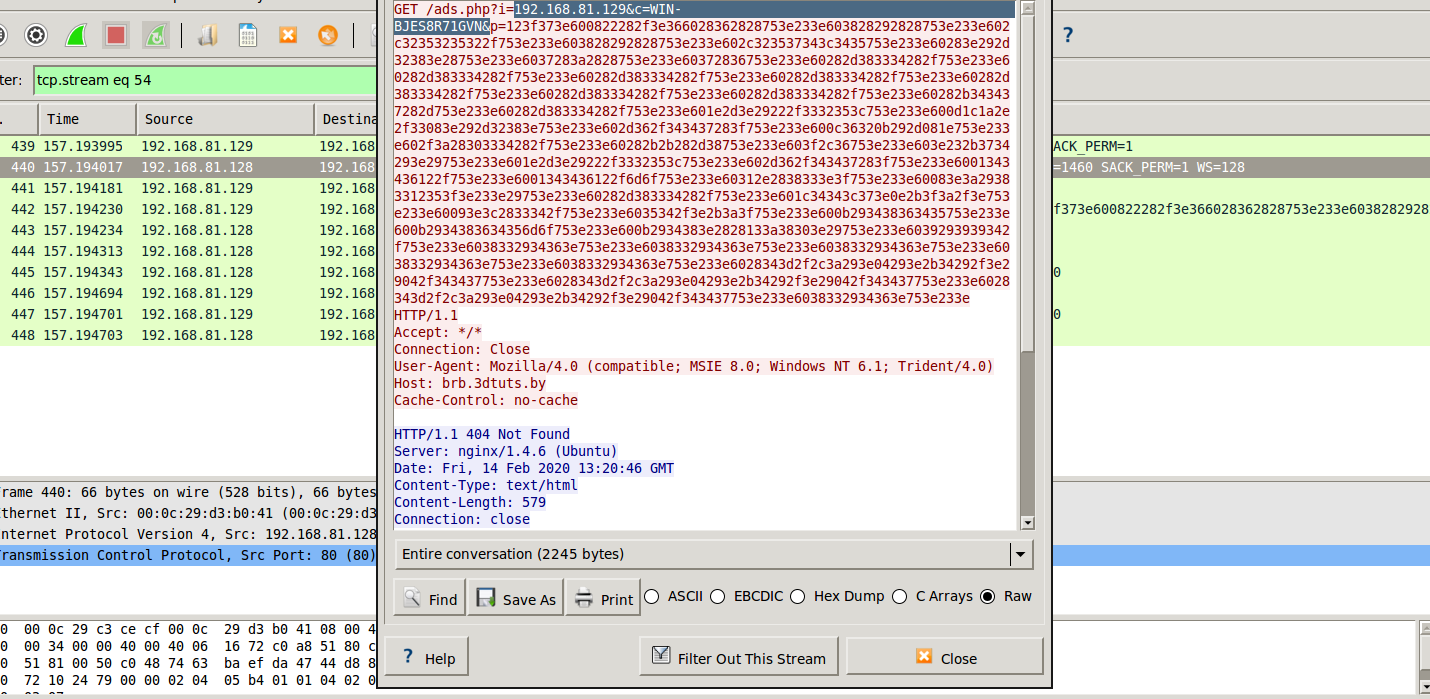
Our malicious file apparently wanted to make a request to a file named ads.php on the remote server. It did this with a get request and used three parameters:
- The I parameter corresponds to the IP address of our infected system.
- The C parameter corresponds to the hostname of our infected system.
- The P parameter is currently encoded in hexadecimal. We can’t read it directly. Even if you convert it from Hex to ASCII, you won’t see any meaningful data because this is not just hex code; it’s also mixed or encrypted data.
We copy the value corresponding to the P parameter and save it on our renux machine for later use. Understanding this value is crucial for understanding the malware.
Behavioral Analysis Summary
So far, here’s what we’ve learned about brbbot:
- It saves one encrypted file to our victim machine.
- It tries to access a site named
brb.3dtuts.by. - It leaks information about the system configuration.
- It sends some encrypted or mixed data.
Now, we will dive into the code of the file for a different perspective on brbbot.
Dynamic Analysis
We still have a few unanswered questions, for example:
- What is the purpose of the Brbconfig.tmp file?
- What is being sent in the GET request with encrypted data?
- How does the attacker control brbbot?
Let’s get started.
We load our file into IDA Pro, a program that allows us to perform dynamic analysis, and look at the Windows APIs the file imports.
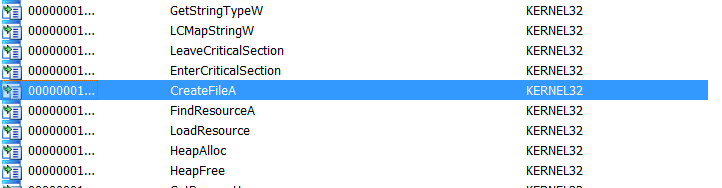
An experienced analyst can gather a lot of information from this. We start exploring from the CreateFile call. This call is found in Kernel32.dll. CreateFile, as its name suggests, allows us to create a file. We’re checking this call because maybe the malware tries to create the brbconfig.tmp file.
Now, let’s go to the code section where the file is called.
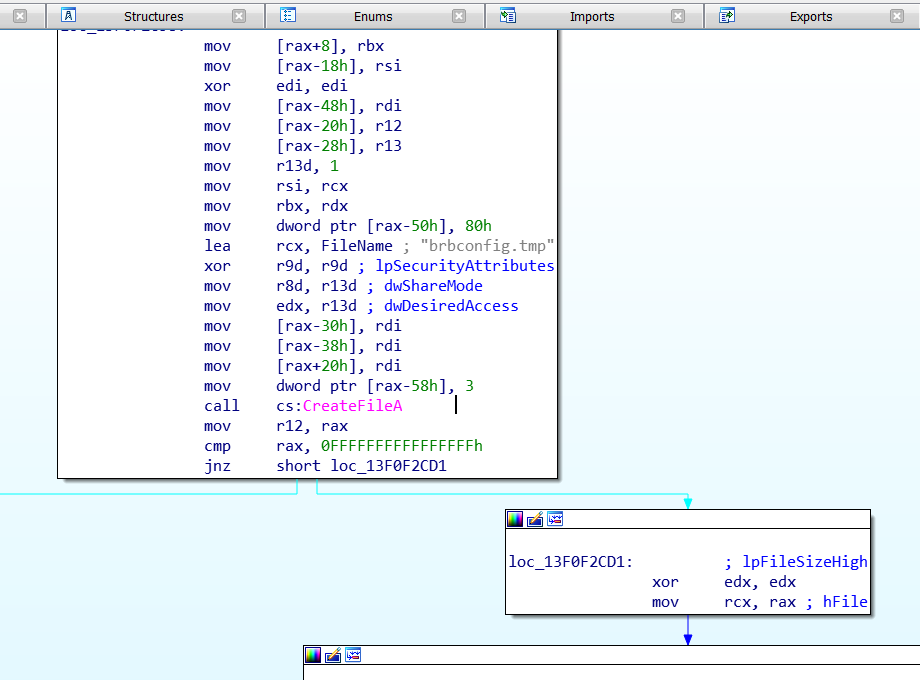
As IDA Pro shows, before using the CreateFile call, the name “brbconfig.tmp” is pushed to the stack. This means that this is where our malware creates the “brbconfig.tmp” file.
After creating the file, we know that there will be operations on the file. Hoping to see something, we scroll down a bit.
A bit further down, we see an API call named ReadFile. Now we’re sure the file will be read. Next in the code, we see a call to CryptDecrypt. Seeing this, a question pops into my mind: is this the section that decrypts the encrypted data from our file after reading it? To find out, we need to run and debug the file. Let’s do it.
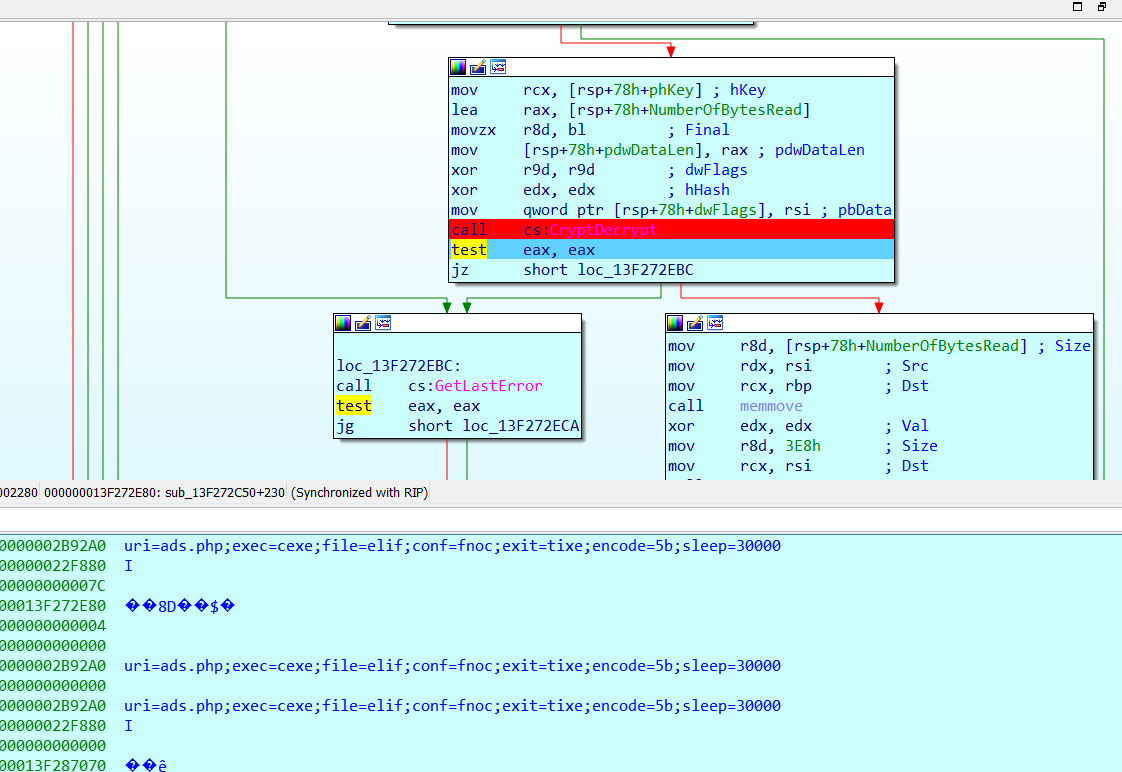
When we reach the CryptDecrypt call, we look at the stack and see our encrypted data now in a readable format.
Now, we know about the commands the attacker runs on the brbbot web server, how often these commands run, and other configuration settings.
The configuration file also has an “encode” parameter and a corresponding value “5b”. The attacker prefers to encrypt potential critical information about the malware and does this by XORing with the “5b” value.
We can now decode the encrypted data from our malware’s earlier request using this “5b” value.

After decoding, we see that it sends the list of running processes on our system to the attacker through a remote connection. This facilitates where and how the attacker will strike. For example, by looking at the running processes, the attacker can determine whether it’s a government agency, bank, or private institution.
Summary
The article provides a detailed walkthrough of how the fakedns tool works in the context of a malware infection. The tool intercepts DNS requests and responds with its own IP, redirecting traffic. Using the Remnux machine, the author demonstrates the fakedns tool in action, highlighting how it can intercept HTTP requests and display the ASCII values of intercepted packets. It was discovered that the malicious file attempts to access an ads.php file on a remote server using a GET request with three parameters. Two of the parameters were identified as the IP address and hostname of the infected system, while the third parameter, represented in hex, was encrypted or scrambled data. By analyzing the code of the malicious file with the IDA Pro dynamic analysis tool, the author uncovers how the malware creates, reads, and decrypts the brbconfig.tmp file. The decrypted data reveals system processes, which can potentially help an attacker determine the nature of the infected system, such as whether it belongs to a government agency, bank, or private organization.